Continuing Introduction to the CodeWarrior/PowerPC Platform
1. Objectives
In this lab you will convert the PCSpim homework averaging program from labw08b, which was written with MIPS instructions, to PowerPC instructions. Then you will continue with the PowerPC assembly introduction.
1.1 Reference
Files for Lab
2. Prelab
Before you come to lab you should handwrite the PowerPC version of the homework averaging problem from labw08b. You can find information on the PowerPC in the manuals located in the lab, or for an online version click here. Specific information for the instructions is in section 8.2. You can also find some instructions in the quick reference: QuickrefPPC.html.
3. Setup
Create a labw10b folder in your 282x lab directory. Follow the instructions for each part.
4. MIPS vs. PowerPC
Convert the homework averaging problem from lab 9b to use PowerPC instructions. Only registers will be used for the output, the program should not print anything out so modify it accordingly. Use RAM addresses for memory. You may use your program from lab 9b, or you may use the code below. Either way, use the homework scores from below. Note that the program below first loads the hw array into memory. Show the TA the final program.
.text
.globl main
main:
li $18, 0x10000000
addi $3, $0, 74
sw $3, 0($18)
addi $3, $0, 80
sw $3, 4($18)
addi $3, $0, 80
sw $3, 8($18)
addi $3, $0, 94
sw $3, 12($18)
addi $3, $0, 85
sw $3, 16($18)
addi $3, $0, 79
sw $3, 20($18)
addi $3, $0, 65
sw $3, 24($18)
addi $3, $0, 87
sw $3, 28($18)
addi $3, $0, 68
sw $3, 32($18)
addi $3, $0, 88
sw $3, 36($18)
addi $4, $18, 0 #fist aguement = int Hw[10] to a0
addi $5, $0, 10 #second ag. int numHw to a1
#call suboutine
jal sum
add $16, $2, $0 #copy result fom $V0
div $17, $2, 10 #calc average
li $2, 1 # system call code for pint_int
add $4, $17, $0 # integer to print
syscall # print average
li $2, 1 # system call code fo print_int
add $4, $16, $0 # integer to print
syscall # print sum
end:
j end
sum:
subu $sp, $sp, 32
sw $ra, 20($sp)
sw $fp, 16($sp)
addu $fp, $sp, 28
sw $4, 0($fp)
addi $8, $4, 0 #get first arguement
addi $9, $5, 0 #get second arguement
addi $12, $0, 1
loop:
beq $9, $0, endloop
lw $10, 0($8) #10 = Hw[i]
add $11, $10, $11
addi $8, $8, 4
sub $9, $9, $12
j loop
endloop:
add $2, $11, $0 #return total
lw $ra, 20($sp) #restore ra from stack
lw $fp, 16($sp) #restore fp from stack
addu $sp, $sp, 32 #pop stack
j $ra
.end
5. Continued Introduction to PowerPC Assembly and Code Warrior
Section 1 – Modifying the Add Assembly Program
Files
|
File |
Description |
|
Add assembly program |
Create a new project in your labw10b folder.
Replace the MainAsm.asm file with Lab10b_add.asm.
Modify the add assembly language program Lab10b_add.asm so that it uses digital input/output for the operands and result of the addition (instead of the DataSeg block in memory) as follows:
LED Bargraph 1 ß DIP Switch 1 + DIP Switch 2
Recall in the last lab that the RAM address is defined in Defines.h. You can find the addresses for the input/output devices there as well. The value of the device is stored at those memory locations. Use the lis and ori instructions to load the address values.
Since the size of the numbers is 8 bits, use the load and store instructions that operate on bytes:
· lbz,
Load Byte and Zero: reads a byte from memory into a register, and pads the
high-order bytes of the register with zeros. For example:
lbz r31, 0(r2): reads the byte at
Mem[r2+0], places it into the LSB of register r31, and zeros the rest of the
bytes in r31
· stb,
Store Byte: writes the LSB from a register into memory. For example:
stb r30, 0(r2): writes the LSB
of register r30 to Mem[r2+0]
· The LED bargraph uses negative logic. Correct the output so that a bar will light to show that bit is a 1.

Make, test, and run your program. Verify its correct operation. Show the TA your code and program operation.
Section 2 – An Assembly Level View of a C Program
Files
|
File |
Description |
|
Simple C program for investigating assembly code in CodeWarrior |
In this part of the lab, you will take a look at the assembly code generated by the CodeWarrior compiler when it compiles a C program.
Step 1 - Create Project
Create a new project and replace the main.c file with the Main1.c file listed above. Use the standard C project. Make sure that the Enable Debugger option is selected from the CodeWarrior menu.
When you are working with CodeWarrior, your C code is compiled to assembly code and then to machine code. CodeWarrior has a special option to allow you to view the assembly code produced by your C code while debugging.
First, execute the code and step inside the Do_Tasks function. Once inside the function, click on the source button to display a short menu list.
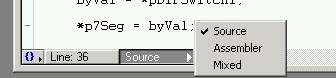
- Source - Displays the source code (C or assembly)
- Assembler - Displays the final assembly code
- Mixed - Displays the source code and the compiled assembly code
Notice the {} option in the corner as well. The braces option shows you the Call Stack (i.e., function A calls function B, calls function C, etc.). The Call Stack can be helpful in determining how you arrived at a function (interrupt, polling, etc.).
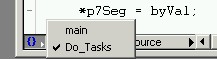
Click on the {} item to switch over to main and back to Do_Tasks. As you switch back and forth between the various functions, CodeWarrior will also adapt the local variable list as well to reflect the function that you are in if necessary.
Once you are back in Do_Tasks, switch to the Mixed view. Notice that code for only the Do_Tasks function is presented. In addition to the C code, the final assembly code is also displayed. This is a combination of machine code (32-bit memory addresses and 32-bit instruction words in hex) and assembly code (mnemonics and operands). Notice the code at the beginning of the function before the variables are declared.
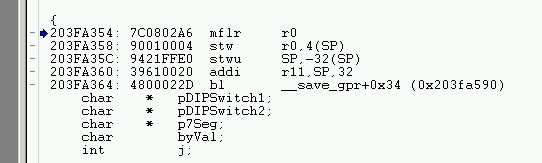
This code allocates space on the stack for the stack frame. Remember, items such as return address (in the link register), local variables, and saved registers are placed on the stack. Notice the use of the SP (Stack Pointer) register as an operand in the assembly code. The SP notation is used by CodeWarrior to make the code easier to follow. The PowerPC does not have an explicit SP register. To see more, open up the GPR window from CodeWarrior.
Window à Registers Window à GPR
Step 2 - Viewing Registers
The GPR window opens up a listing of the General Purpose Registers in the processor (r0 to r31).
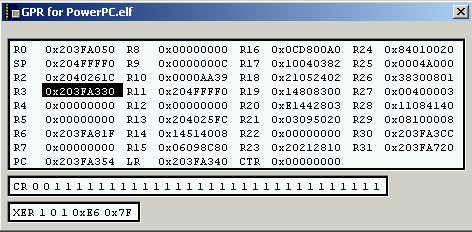
Notice how r1 is not listed. CodeWarrior uses r1 as the SP register. Thus, in your assembly code, you should avoid using r1 for your programs. You can also change the method used to display the register. Right click on an individual register to change its type.

Step 3 - Stepping Through the Assembly Code
When you are using Mixed or Assembler view, each debugging step will execute a single assembly instruction. Step through the code and watch the GPR window. You may need to shrink the code window in order to view both windows at the same time. Notice how registers that have changed are highlighted in red. The PC (Program Counter) register changes every time and displays where you are at in your program. Is the PC word-aligned?
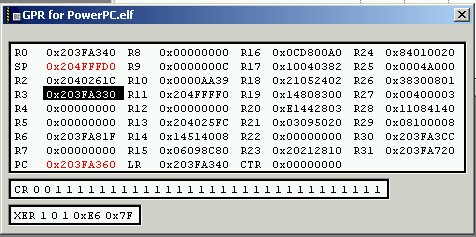
The value of PC corresponds directly to the memory addresses listed in the first column of the machine code view: compare the PC in the GPR window above, with the memory address of the current instruction in the Mixed code window below. Your debugger windows will probably have different values, but you should make a similar observation.

Notice the first two columns in the code window: each assembly instruction mnemonic is preceded by two 32-bit hex numbers. The first number, e.g., in the top line, 203FA354, is the memory address where that instruction is located. Again, note the similarity between the value of the PC and the memory address. The PC contains the location of the next instruction to be executed. The blue arrow (pointing to the next line to execute) matches exactly the value of the PC. The second number (looking at the top line, 7C0802A6) is the actual instruction word consisting of opcode and operand fields. Since each instruction in the PowerPC is 32 bits long, CodeWarrior can easily translate between raw machine code and assembly code. You will learn more about this later.
Step 4 – Executing the Code
Switch back to the Source view of the code. Read the code and make sure you understand the C code. Switch back to the Mixed view, and step through the code until it finishes running. As the code executes, observe which assembly instructions and registers are used to implement statements in C.
Questions
Answer the following questions by inspecting the Mixed code window, write the answers on the answer sheet.
1. What assembly instructions implement this C assignment statement?
byVal = *pDIPSwitch1;
2. What assembly instructions implement this C for loop?
for(j=0; j<*pDIPSwitch1; j++)
{ byVal +=
1; }
Section 3 - Calling an Assembly Program
|
File |
Description |
|
Source assembly file for Section 3 |
Step 1 - Create a Project
Create a new assembly project from the project menu. Select Asm+C instead of C. The Asm+C option creates the appropriate linkage from C to assembly for linking the code together. Replace the MainAsm.asm file with the Lab10Asm1.s file. Make sure to click the Enable Debugger option as well from the menu.
Step 2 - Examining the C Linkage
asm void JumpAsm ()
{
fralloc
bl StartAsm
frfree
blr // Branch to link register location
// i.e. return from function
}
CodeWarrior supports the direct inclusion of assembly into C files. The asm keyword in front of the function is similar to using the asm { } directive in C. Inside of the inline assembly function, it is possible to use PowerPC assembly code.
- fralloc - Create a stack frame for correct program operation
- bl StartAsm - Branch & link to the StartAsm label in the assembly code
- frfree - Free the stack frame
- blr - Branch to the return address in the link register - equivalent to the return keyword in C
Step 3 - Examining the Assembly File
Now, open the Lab10Asm1.s file. Assembly files may use either the .s or the .asm file extension in CodeWarrior. Let's take a look at some of the extra information at the beginning of the assembly file.
.export StartAsm
The '.' is the assembly equivalent of the # sign in C. The export directive tells the assembler to export the StartAsm label to other files for linking. Without this directive, the linker would not be able to find our assembly code from main.c.
.include "defines.h"
CodeWarrior allows us to include files. Since defines.h contains only #defines, the assembler does not give us any errors. If the header contained actual C code, the assembler would generate an error. The defines.h is helpful for accessing the I/O ports on the PowerBox. Try including PPC_Support.h to see what happens when C code is included.
.function "Lab10bAsm1", PPC_Start_Asm, PPC_End_Asm-PPC_Start_Asm
This directive is used to tell CodeWarrior how to debug the code. Without this, the debugger would simply show us inline assembly without any contextual information. This makes debugging the code much more difficult. The syntax for the function directive is as follows:
.function "FunctionName", StartAddress, TotalLength
FunctionName - Any unique name
StartAddress - Starting address to include in debugging
TotalLength - Simply subtract the two labels to get the length
.text
The text directive signifies that executable assembly code is to follow. You can also use a .data section to mark a data area and switch back and forth at any time.
Question
Answer the following question by inspecting the Mixed code window, write the answer on the answer sheet.
- What is the size of the code for the StartAsm function, in bytes? That is, how many bytes are used for the code in StartAsm?